


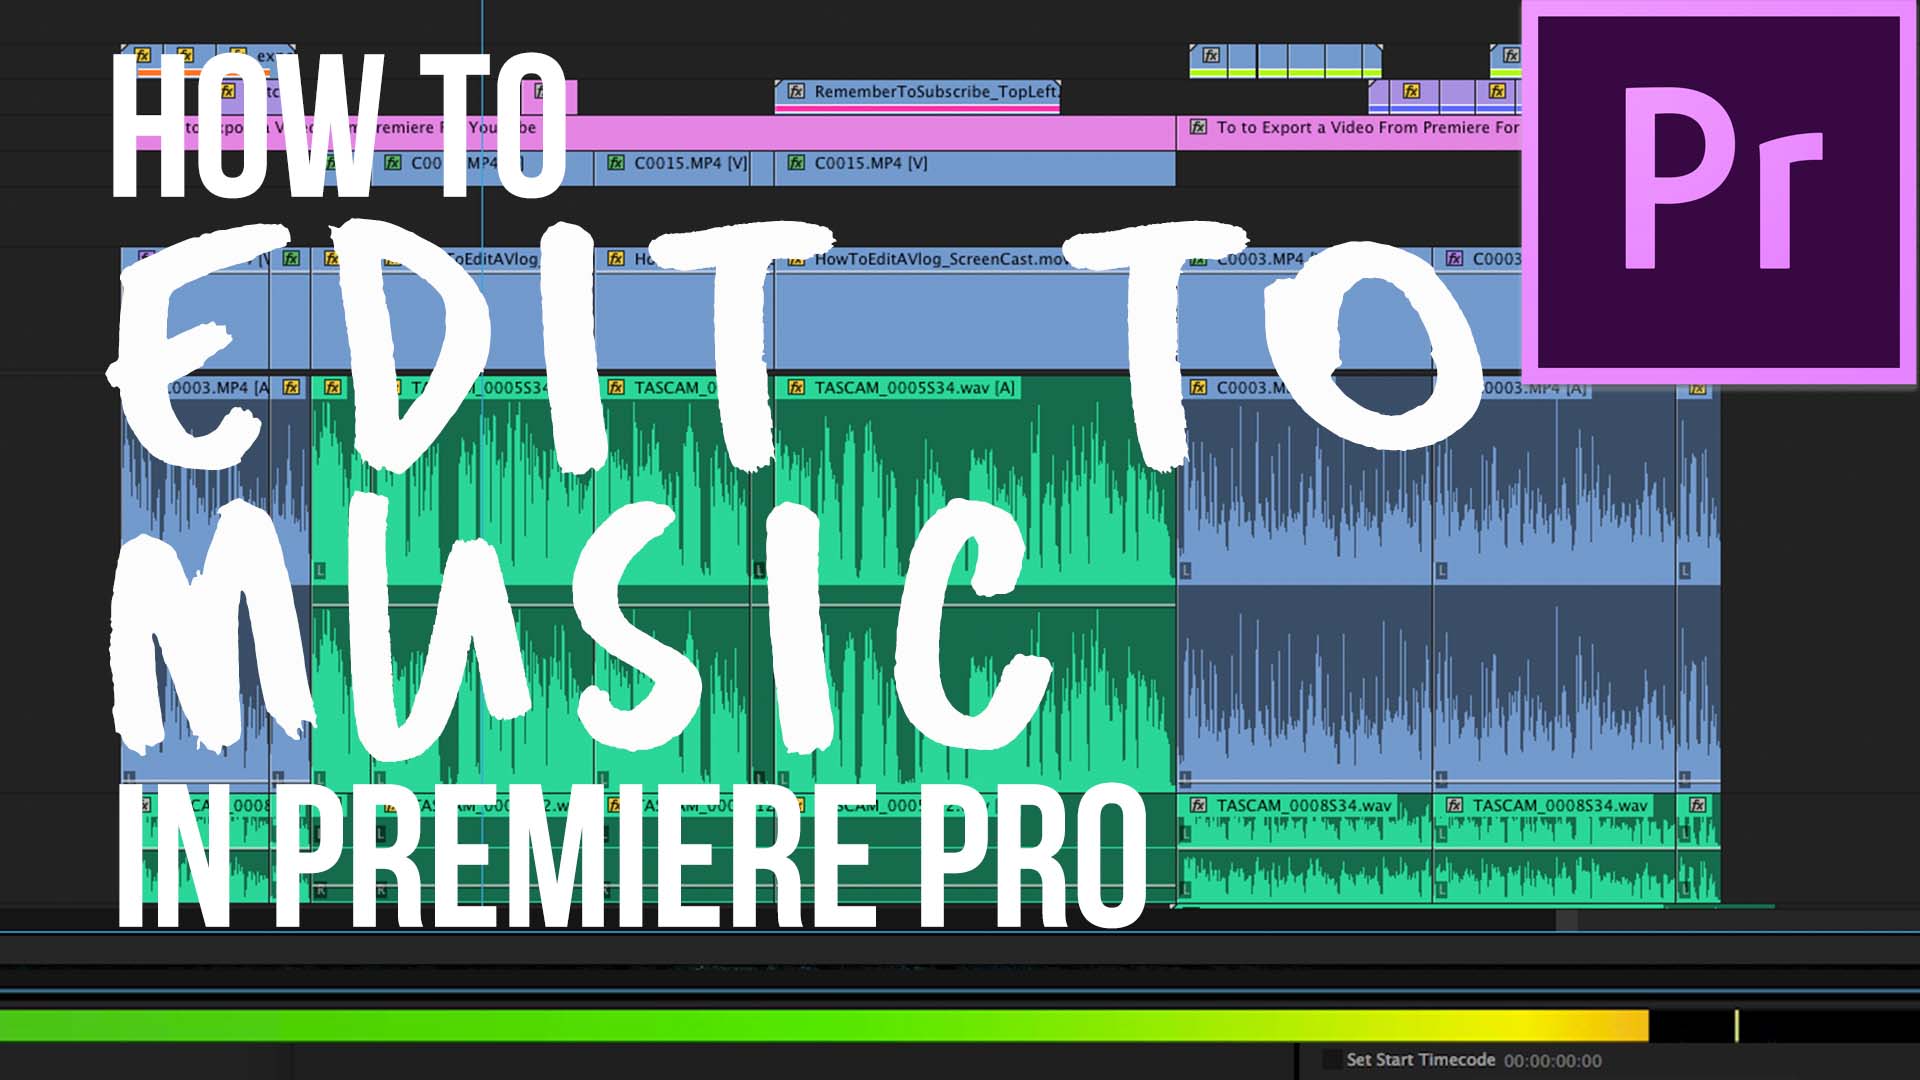
How to Edit to the Beat of the Music
Join the collective for free http://Left.ly/Collective Be part of an epic community who receive my videos and tutorials early every week! http://Left.ly/Collective You will also receive free adventure filmmaking tips by joining the Collective, did I mention it was free?? I have a guide of all my software tools available to all new subscribers.
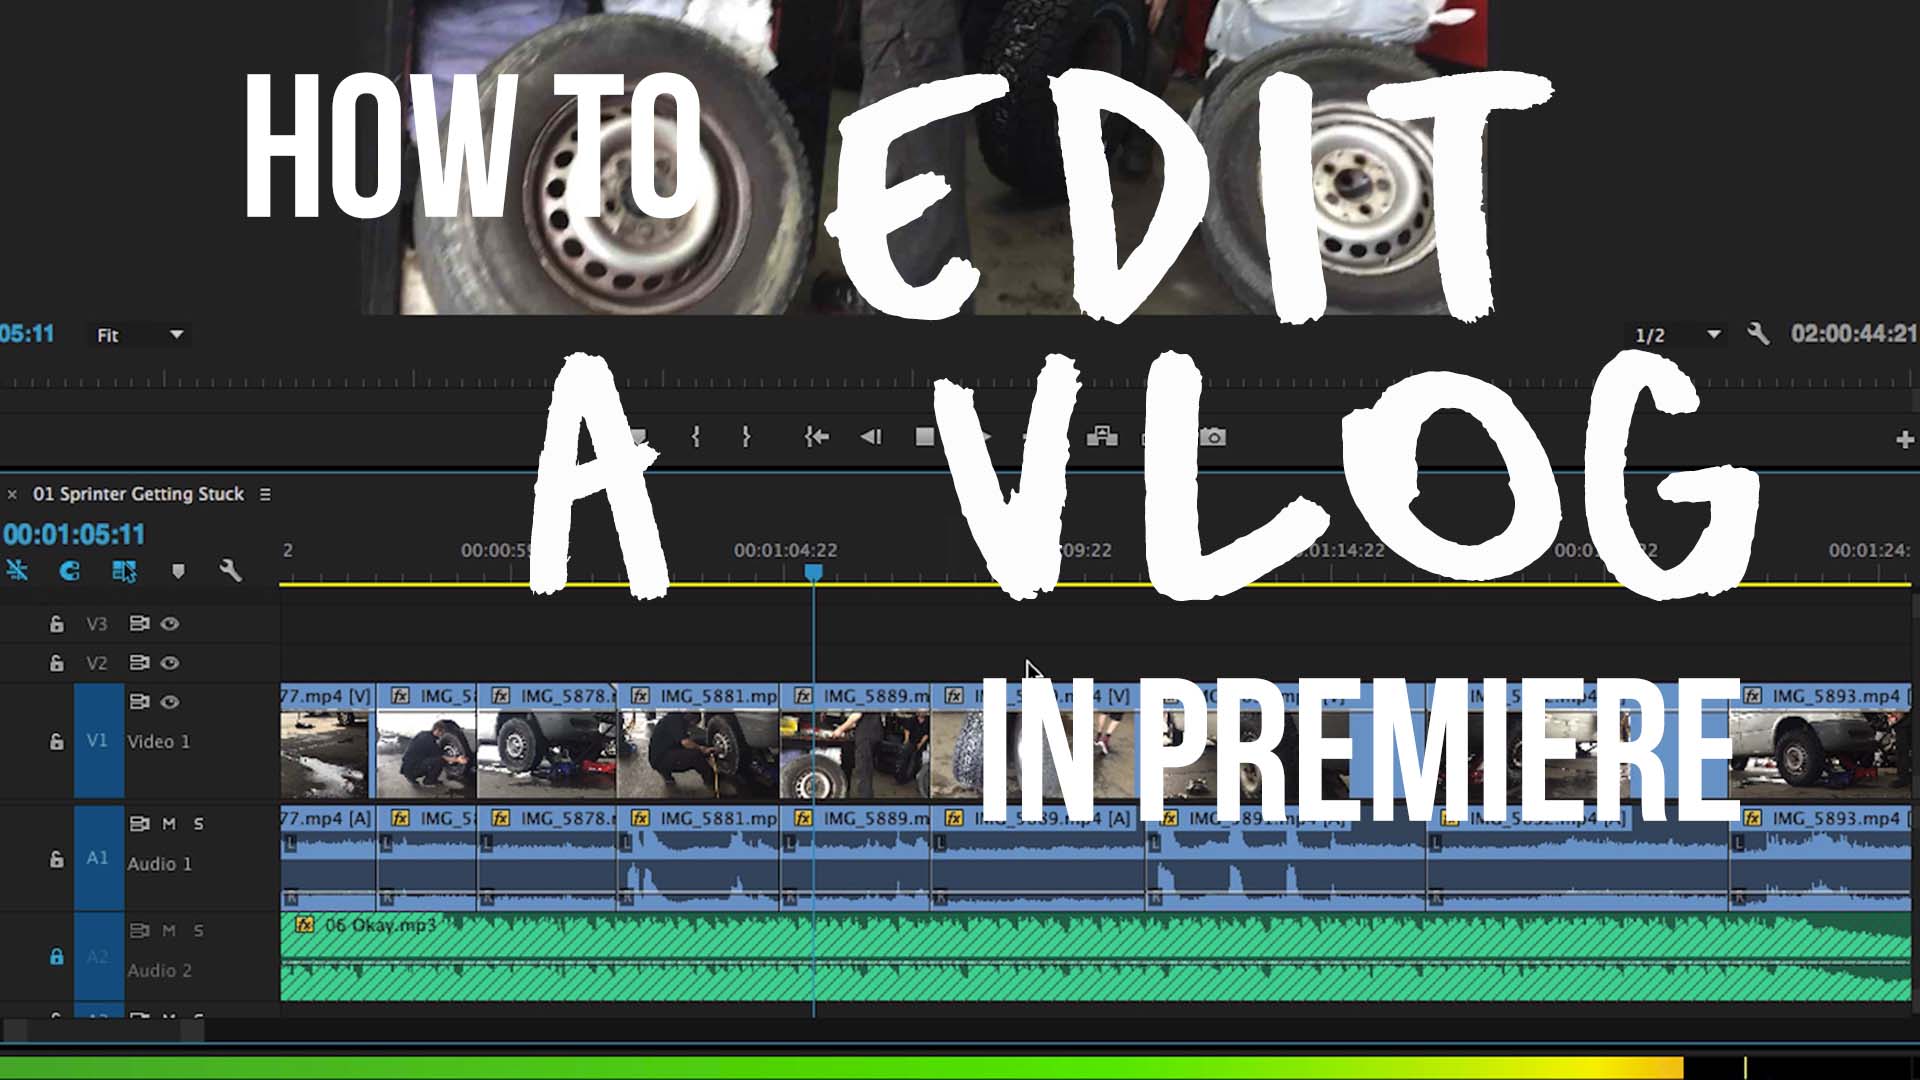
How To Edit a Vlog in Premiere Pro
How To Create a New Sequence In Premiere Pro

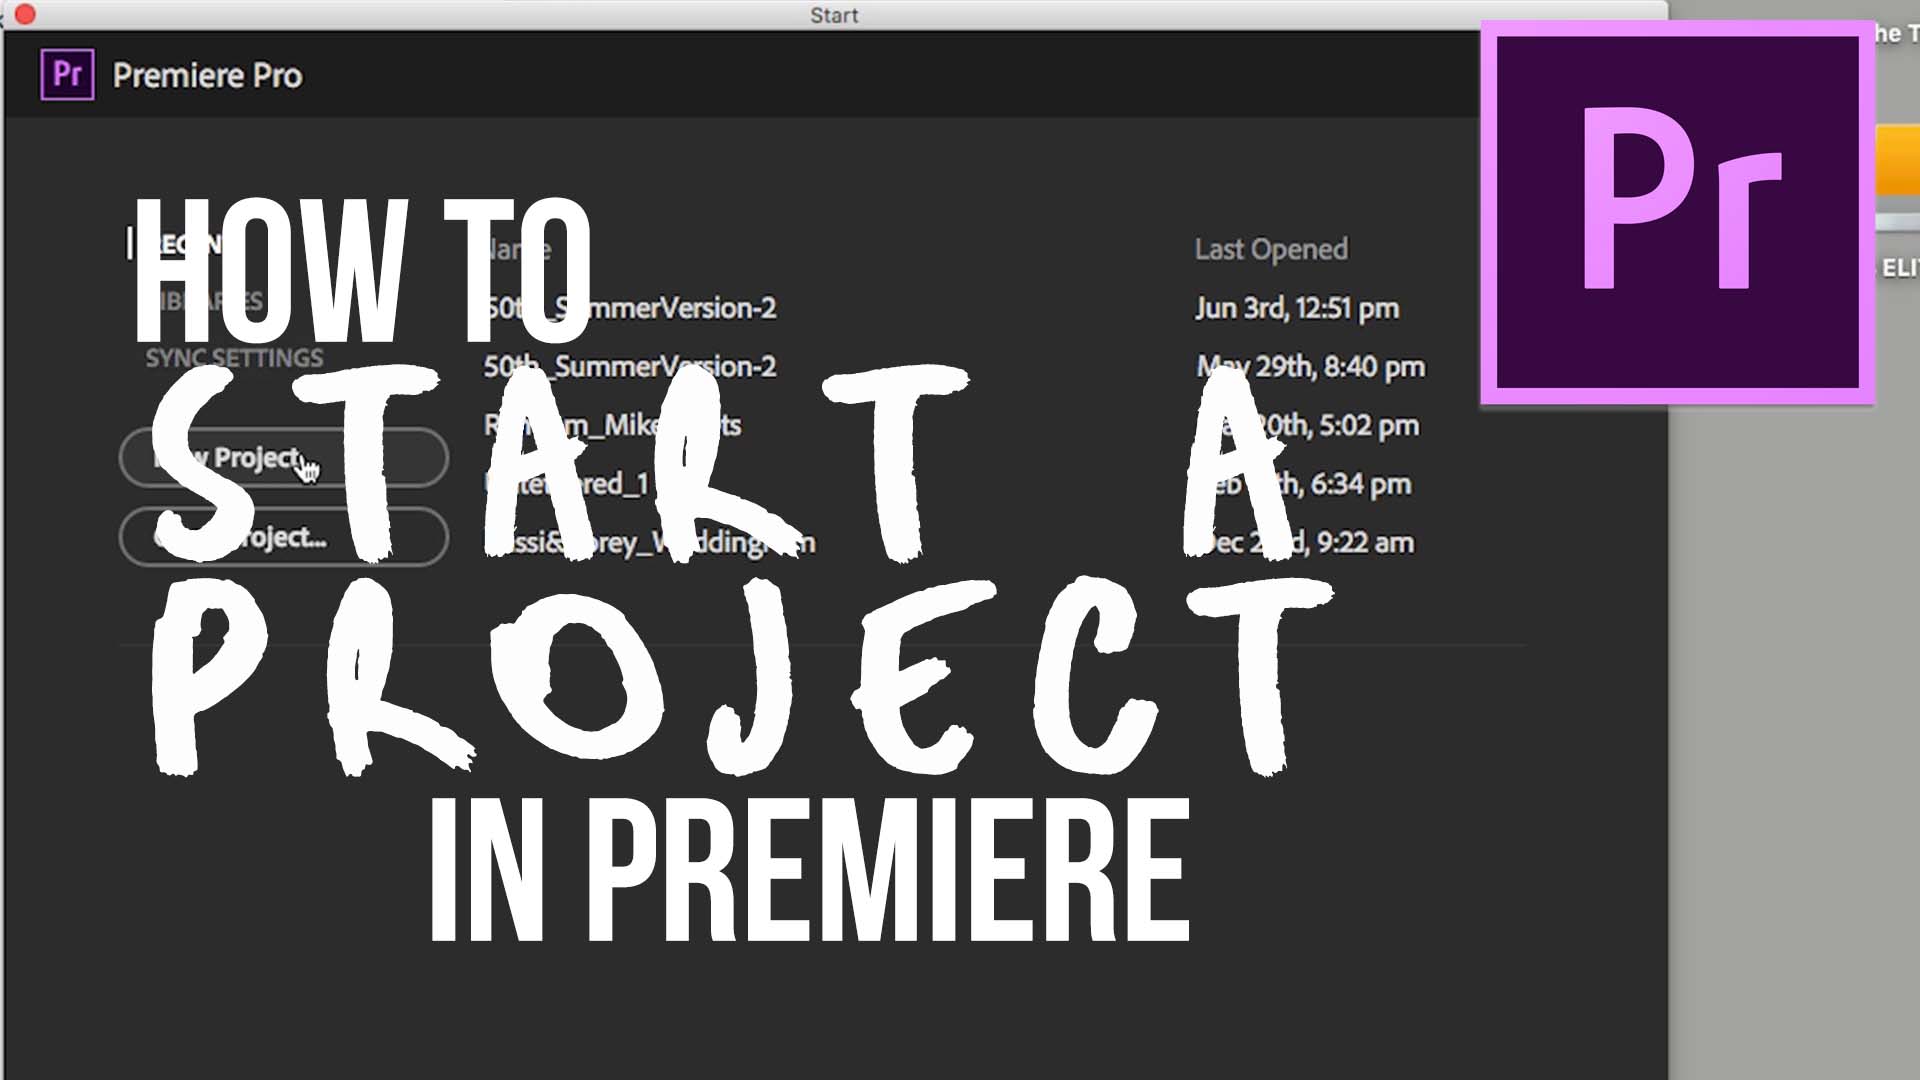
How To Start and Optimize a New Project File in Premiere
How to Organize Your Media For a Vlog

How to Edit an Entire Project in Premiere Pro

1. How to Organize Media For a Vlog
2. How to Start a Project In Premiere
3. How to Create a New Sequence in Premiere Pro
4. How to Edit a Vlog in Premiere
5. How to Edit to the Beat of the Music
6. How to Export a Video From Premiere
Which Video Mic Should You Buy For Indie Documentaries?

Getting good audio can be scary to say the least. For most of us it’s an area that’s hard to wrap our heads around, and unfortunately it often gets just scraps of our attention. If you are an indie filmmaker like me, I challenge you to start taking responsibility for making sure our films have better sound. In the documentary space it can be tempting to get lazy, but I assure it’s such an important aspect to what makes a film feel immersive. Shooting Untethered I had a really simple audio kit. Using some basic principles though I was able to capture great on location sound while keeping things in my budget. I had to be flexible and light as there was no dedicated audio person for the shoot.
Watch This Video Where I Talk About My Ideal Sub 400$ Audio Kit
My Indie Documentary Audio Kit
- Rode VideoMic - Find Prices Here
- Zoom H1 (I have two of these) - Find Prices Here
- Giant Squid Omni Lav (I have two of these as well) - Find Prices Here
- Shock Mount for Zoom H1 - Find Prices Here
- Movo Professional Windscreen - Find Prices Here

Rode VideoMic - Find Prices Here
The Rode Videomic basically lived on both cameras the entire time while shooting. I got fantastic audio from this mic and I am really happy with the results when paired with the GH4 and auto levels. I didn't have clipped audio once, and I am satisfied with the minimal amount of hiss I hear in the audio.
I like this version over the videomic pro because of the lower price point, longer barrel (better for side noise cancelling) and I also purchased this right before the new videomic pro was released with the better shock mount. This shock mount is the best in the game, love it. No fiddling with stupid rubber bands.

Zoom H1 with Gian Squid Audio Lav
Zoom H1 With GianT Squid Omni Directional Lav - Find Prices Here
This package right here as been a work horse for me. Most wireless systems cost a lot, and frankly can be kind of finicky at times. I really like having a system I know just works. I also love that it needs only one AA battery and your good to go for hours. I used this setup constantly on Untethered in order to get great sound of the athletes when they were walking on the line.
- Zoom H1 (I have two of these) - Find Prices Here
- Giant Squid Omni Lav (I have two of these as well) - Find Prices Here

Zoom H1 Audio Shock Mount
Zoom H1 with Shock Mount - Find Prices Here
Another way to use the H1 is as it was mainly meant to be used. As a stereo capture device. I love mounting this to the top of my camera with a shock mount and running the feed straight into camera. As you can hear in my video examples great stereo audio is super immersive. This setup is cheap, simple, and gets amazing results. Make sure to buy a H1 windscreen!
Two Tools To Step Up Your Audio Game
- Tascam DR70d - Find Prices Here
- Rode NTG3 Shotgun Mic - Find Prices Here

For the sit down interviews I shot with spencer I used a more elaborate boom mic set up. I was lucky enough to borrow the fantastic Rode NTG3 which is a crazy awesome shotgun mic. I ran it into a DR60D (pictured above is my new DR70D which I like a lot better for form factor). This setup is incredible and I definitely recommend renting or investing in a good set up like this down the road. You can get some amazing interview audio with this mic!
The First Tool You Should Buy For Camera Support
Today we are going to look at the best piece of camera support equipment on the market for adventure filmmakers. Or any filmmakers for that matter.

As indie filmmakers we should always be looking for gear investments that have the highest possible ratio of cost vs. results. With that in mind, the tool I am recommending is not a 3 axis gimbal, it’s not a drone, it’s actually just a plain old tried-and-true monopod. You’ve probably seen one of these before, and maybe you’ve thought, hey that works for that wedding guy, but I prefer my tools a little more high tech or pro looking. Don’t think of yourself as too good for the monopod. I am going to show you why this tool can help move the needle the most on achieving cinematic results for the lowest upfront investment.
I think this tool will be the fastest tool to help you develop your cinematic eye.
A monopod allows you to be more mobile and flexible than almost any other tool. It is the fastest way to cover many different perspectives of a scenario and then decide which ones you like the most. I’ve seen people who started out by purchasing a tripod and a slider. Then they mount their slider to the tripod and try to shoot from that the entire time. In the edit room they are trying to decide what to do with all these shots that just slide left to right from the same perspective. That’s because in a way the visual aspects of filmmaking is like good writing. You need to use varied words and expressions in order to create a pleasant cinematic experience. You can’t add an exclamation point on the end of every sentence and call it engaging writing. The same goes with filmmaking. Camera movements should be used intentionally, and a monopod helps you learn the foundations of these principles.

The Best Monopod Out There
Simply without question Sirui is making the best monopods on the market. The model I recommend is the Carbon Four Section Monopod from Sirui. If you would like to save some money you can go with the the Aluminum Four Section Version. I really do recommend the weight savings of the CX version though.

You are also going to need a fluid head of some kind
I like the heads from Manfrotto, but literally any brand of fluid head will do the trick.


You Can Double Your Edit Speed // Editing Adventure Films
https://www.youtube.com/watch?v=i5_q50c9k7k
Once you get a basic grip of your editing software, you will move from baby steps to starting to learn some of the secrets of the trade.
Tips and tricks that will make a massive difference in how you edit your projects are worth the time to learn as soon as possible. For me when I learned this trick I am going to share with you, I was literally laughing at how much faster it allowed me to edit. Something so simple and yet so effective.
The trick I am teaching you comes in handy during the stage of your project when you are cutting your selects from your footage. You are trying to find the best moments from what you shot and start to build a video.
You need to edit fast, ignore getting specific and lay out a rough cut as fast as possible. Don't waste your time getting picky with the length of your shots.

Screenshot 2015-06-25 09.39.32
STEP 1: Set In and Out Points With a Shortcut
When you have your sequence created, use the short cuts 'I' and 'O' in order to set your in and out points efficiently. These are the points that premeire uses to drop that section of the clip into your sequence.
STEP 2: Drop the Clip into Your Sequence
Once you have selected your in and out points use the comma key ',' to drop it down into your sequence at your play head.
SPEEDING UP THE REFINING OF YOUR EDITS
Now that you have your rough cut laid out you can begin to cut more finely the clips you want to use in your edit. A huge way to speed this up is use the keyboard shortcuts of 'Q' and 'W'. When you press Q it will 'ripple delete' the clip beginning to your playhead. When you press W it will 'ripple delete' the end of the clip to your play head. Go on, give it a try.
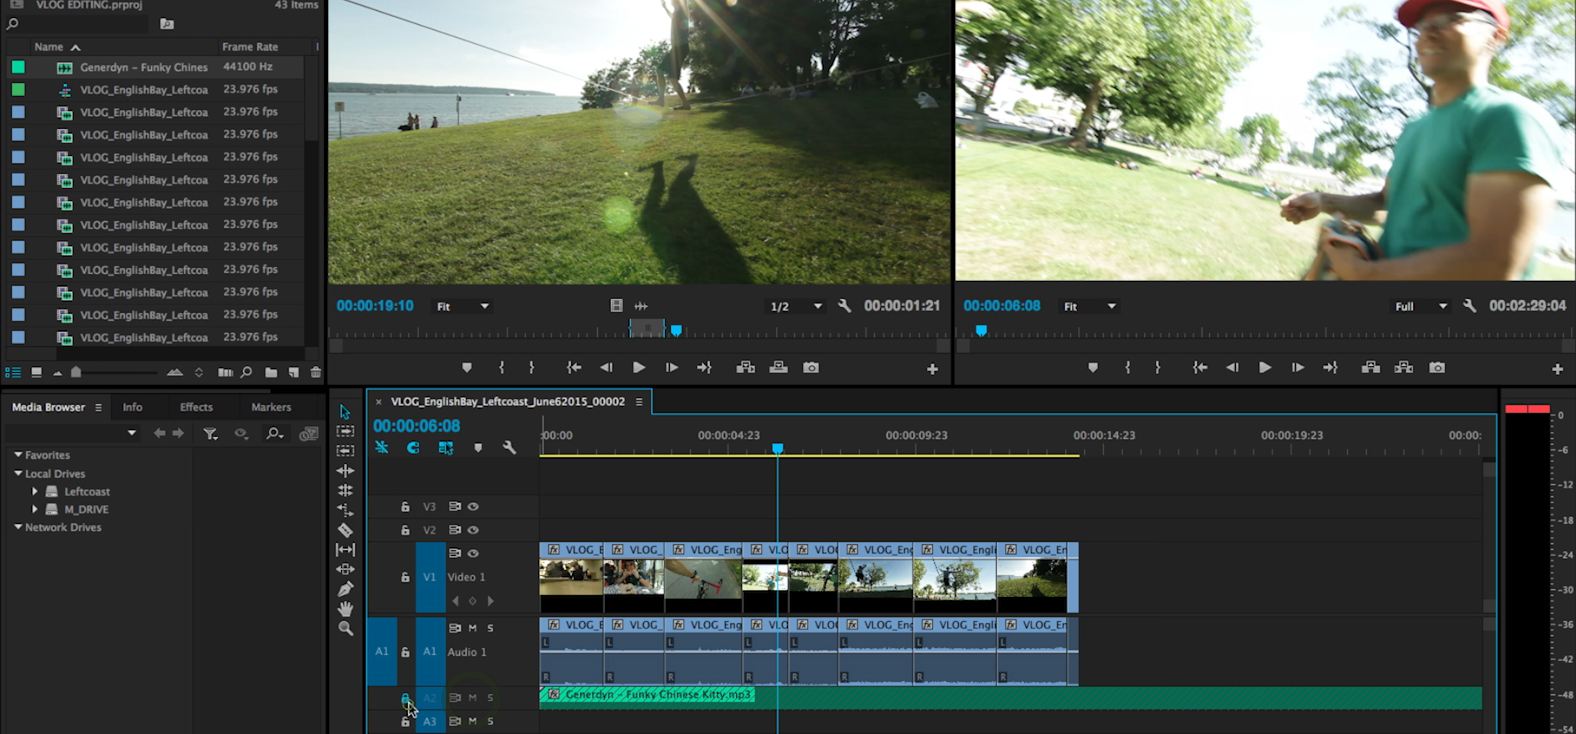
Using the lock on a video audio track for when you ripple cut
Some things to note: Ripple cutting will chop every layer in the sequence that is not locked. This is important to note if you have a music tracks that you do not want to end up all chopped up. You can work around this by simply locking the track.Refining your edit with ripple cuts is an extremely efficient way to edit to the beat of the music. Play in your timeline and pause exactly at the beat you want to cut to, then use a ripple cut to make it happen.
I love this tip. I hope it has helped you. If you have any questions connect with me on Facebook or join the Leftcoast Collective to contact me directly!

book cover
Download Free Guide
I have made this guide available to all current and future subscribers of the Leftcoast Collective. If you would like to receive a copy of it directly join the Leftcoast Collective bellow. I will continue to send free great content every Thursday and you can unsubscribe at any time. [yks-mailchimp-list id="e34efe9754" submit_text="SEND ME THE FREE EBOOK!"]
Written by: Levi Allen VanderKwaak

Levi Allen
How to Add Film Grain to Your Projects in Premiere Pro CC
You can view more of my films on Vimeo
Film grain is a fantastic way to help add an organic look to your digitally shot footage. I use it often, almost every project I work on actually. It's especially helpful when you are using denoising plugins and the absence of grain becomes a little unnatural. I am going to show you how you can add film grain in Premiere Pro CC, but the same principles apply to all editing programs.
Here is an Adventure Film that I added Film Grain Too
A Free Pack of Film Grain
Here is where you can get a free film grain pack: Gorilla Grain. The sign up form to receive the download is on the right hand side.
Step One: Finish Your Edit
Add your film grain after you have completed your edit and color correction. Adding it to your Timeline can slow down playback so I prefer to add it last. One thing to note is when you are color correcting you can be a little on the dark side because *when you add the grain it brings up the brightness of your shots. *
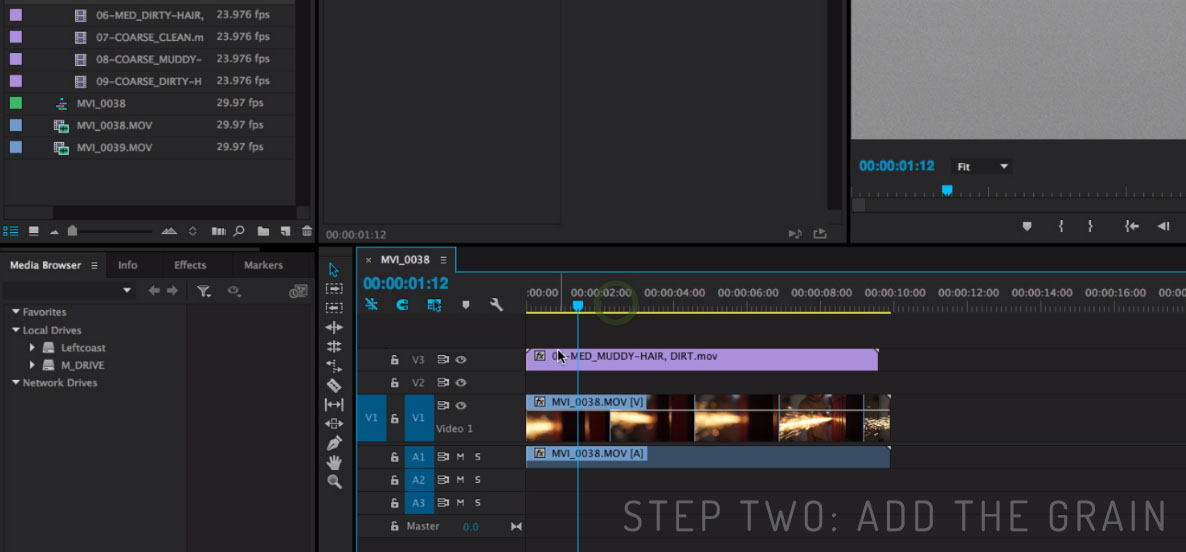
Step Two: Import Your Grain and Add to Sequence
After importing your grain pack of choice you have a few options to pick from. Most packs will come with a Fine, Medium, and Course grain. They also come in varieties of how much dirt or grit the have in them. My favorite is Medium Clean, once you have selected your add it to your sequence in the layer above your footage.
Step Three: Change Blend Mode to Overlay

stepthree
Go to the effects controls panel and drop down the opacity settings. Then change the blend mode to overlay. Windows>Effects Controls>Opacity>Blendmode>Overlay You can fine tune how much grain you want by using the percentage. I tend to use somewhere between 60-85% most of the time, but it is really your call.

Step Four: Multiply the clip across the sequence
When your grain is fine tuned, you can copy and paste it across the rest of your sequence. If you make any changes to your settings you can select opacity from the effects controls window, copy it, and then paste it to all of your clips to change them as well.
Bonus Tip: Helping Your Dissolves Work

addacolormatte
You will notice now that if you try add a dissolve or fade to black on one of your clips it does really work. One way to fix this is by adding a black color matte underneath your shot that has the fade to black. You can make a color matte by going to File>New>ColorMatte
Well there you have it, a really straight forward process. I encourage you to give it a shot and see how you like the results. I love the way it looks on my adventure films and other pieces that I want organic texture in. If you have any questions please do not hesitate to ask. I love that you stopped by to watch this tutorial. It would be great to see your results, connect with me on twitter or Facebook and show me what you've made.
Until next time, Remember life’s better when you make stuff
 RECEIVE FREE GUIDE & NEW TUTORIALS
Subscribe to get my free guide, and receive all the latest adventure content straight to your inbox.
Levi Allen
Taking Event and Travel Videos to the Next Level

I am going to teach you a few tips on how to take your next travel or event video to the next level. (Spoiler Alert: Gear doesn't help as much as you would think)
Okay, so you feel pretty comfortable with your camera. You know how to work it and you think you could tackle documenting your travels or shooting that next event video you've been hired to make. But you might be asking, as I have been asking, "how do you take your video from being just a simple montage to an intriguing story."I encountered more answers to this question on a recent shoot I got to help with. The event video is in a category of its own (as far as event videos go). Yes, really expensive gear was used on the shoot, but there was more happening than just gear. Today I am going to share with you a few of the simple steps i've been learning about developing your story and improving your videos dramatically.
I am going to use this event video as an example of how you can incorporate story elements into your videos. First I want to give you a little bit of context to this project. As I wrote about earlier, I truly do feel that one of the best things you can do when exploring using your passion to make a living, is getting to do the actual work hands on. The actual work itself; the daily grind. Not just the dream you have in your head of what it could be. The fastest way I can find to do that is working temporarily for another company. Taking this step is totally okay on the journey to growing your own company. You will learn more faster and get to see the inside workings of a company first hand.
This stage of working for others is what I currently am at. I sought out working with a fantastic production company here in Vancouver City, Transposition Films. It's a small operation that consistently pumps out stunning content of top quality. I really respect the two partners that own and run the company; Ryan and Josh. Working with Transposition so far has been a blast.

- Above is the DP Josh Knepper and Myself!
This video was produced by Transposition Films. The role I played was helping the DP Josh Knepper operate the A Cam. I only played a small part of the production, but I will speak of the project from a holistic perspective. The credit goes to the all the others that worked hard to make this a reality.
Pretty Fantastic Video Right?
I mean as far as event videos with extremely tight turn arounds go, this one turned out fantastic. I have to say my favorite part and what I believe really brought it to the next level, is the way the team was able to develop a story around this production.
SO MANY TRIP OR EVENT VIDEOS END UP BEING 5 MINUTE MONTAGES OF RANDOMLY STITCHED TOGETHER SHOTS. QUITE BORING ACTUALLY.
So often when setting out to make a video you can feel desperate that you need to get enough coverage of absolutely everything. Then when you go into the edit you feel as though you need to include all the components of what you shot. This is the first misnomer I am going to debunk.
Your Video Can't Possibly Include Everything, So Stop Trying To.
Less is more. Focusing in on a visual motif, a story line, something that can carry the piece along. These are all critical steps to kicking things up a notch. This is one of the most important things I have to say. So hear me now, focus in on a single element of what's happening in your video. Is it an event with people at it? Focus in on one person to try tie the whole thing together and show their experience. Making a travel video? Try share why you are visiting certain locations and why the viewer should care about the landscapes you are showing them. Share in the video how they moved you. With the Run For Water video there was so many things we could have included. Literally thousands of options. Instead of trying to include it all we focused in on one component or storyline. The piece is infinitely better for this reason. There are many storyline options you can chose from.

I just saw a travel video made by Jeff Sheldon. I really like this video because Jeff implemented good visual storytelling without having crazy expensive equipment. He implemented a strategy to give the beginning of his video more focus. His filming wasn't incredibly complex or with expensive gear, but he used the tools he had and focused in on a component of the story. You can find the video here https://vimeo.com/110170664.
Jeff starts off this video with the shots of feet walking on all sorts of different ground. It really helps establish the feel of a travel video and that there were a lot of places visited. It focuses the viewer in to this idea that they are experiencing a trip from the perspective of Jeff, the owner of those two feet. It is something so simple but starts off the video so well.
Try to Develop a Story Thread Beforehand
Putting in effort on the front end to develop or think about your potential story, helps give you focus when it comes to the day of shooting. Doing this before hand means you're not trying to piece together a thread afterwards from the footage that you already shot. The concept for the Run for Water film was simple, a mirrored day in the life of a girl doing the run to raise money, and a girl that will benefit from the donated money. Since we developed this story thread ahead of time we were able to get strategic shots of our talent on the day of that helped to tie the whole piece together.
Do not Use Your Gear as a Crutch
Having great tools is fantastic, but they certainly aren't going to make the story for you. I am fully confident we could have shot this event with our iPhones and still told an intriguing story. Sometimes you can get so caught up in trying to use fancy gear on the day of that you actual miss a lot of the important details. On the flip side, far to often I hear people say that they can't create good videos until they have *insert dream piece of gear* to shoot with. This is simply not true.
LIMITATIONS CREATE EXCELLENT OPPORTUNITIES
When you have limitations it actually forces you to focus instead of paralyzing you with options.
Go with the Flow, Capture Life as it Happens.
Seriously, just run with it. Document things as they happen and try not to stress to much. You will make mistakes. You will miss some fantastic moments. But if you work hard you will also capture some of those beautiful moments that no one could have planned for. Sometimes when you are shooting it can feel like every single person in your vicinity is looking at you. When I first started shooting events I found this oddly uncomfortable. For some people it can be even worse and they will feel like they should shoot at all. Here is the truth. People are not thinking about you or judging you as much as you feel.
That is the reality and you have to keep telling yourself that. Yes there is the occasional jerk, but most people won't give a passing thought to you and your filming. Of anything they will just find it interesting and then move on with their day. Don't let what you feel others could be thinking prevent you from shooting boldly. Who cares if it looks like your too 'into it.' Get the shots you need and try your best not to worry about other people. This is were there is a big benefit to shooting with a simple camera system. The more gear you add and the more fancy you look the more attention it will draw. You can use a really small get and get fantastic results without drawing much attention.
I truly do hope this gives you some ideas for your next event shoot. Remember, try your best to focus in on a story element that can help pull the whole thing together. I would love to see the results of your efforts. Tweet at me @theLeviAllen and I would love to see what you are making.
Remember,
Life's better when you make stuff.
Download Free Guide
I have made this guide available to all current and future subscribers of the Leftcoast Collective. If you would like to receive a copy of it directly join the Leftcoast Collective bellow. I will continue to send free great content every Thursday and you can unsubscribe at any time. [yks-mailchimp-list id="e34efe9754" submit_text="SEND ME THE FREE EBOOK!"]
Written by: Levi Allen VanderKwaak

How to Get Fantastic Interview LAV Audio on the Cheap

LET'S FACE IT, GETTING GOOD AUDIO WHEN YOU ARE STARTING OUT CAN BE AN EXTREMELY DAUNTING TASK. I AM GOING TO SHOW YOU A TIP SHOWN TO ME WHEN I WAS JUST STARTING OUT. GETTING YOUR FIRST LAV MIC DOESN'T NEED TO BREAK THE BANK AND CAN STILL GET FANTASTIC RESULTS IN MANY AREAS OF APPLICATION.
I first learned this out of necessity when I had my first wedding to shoot, but now I use it all the time for all sorts of applications. The trick is fairly straightforward and not terribly innovative, but the results are fantastic.

GreatInterviewSound_Leftcoast_May2015_00006
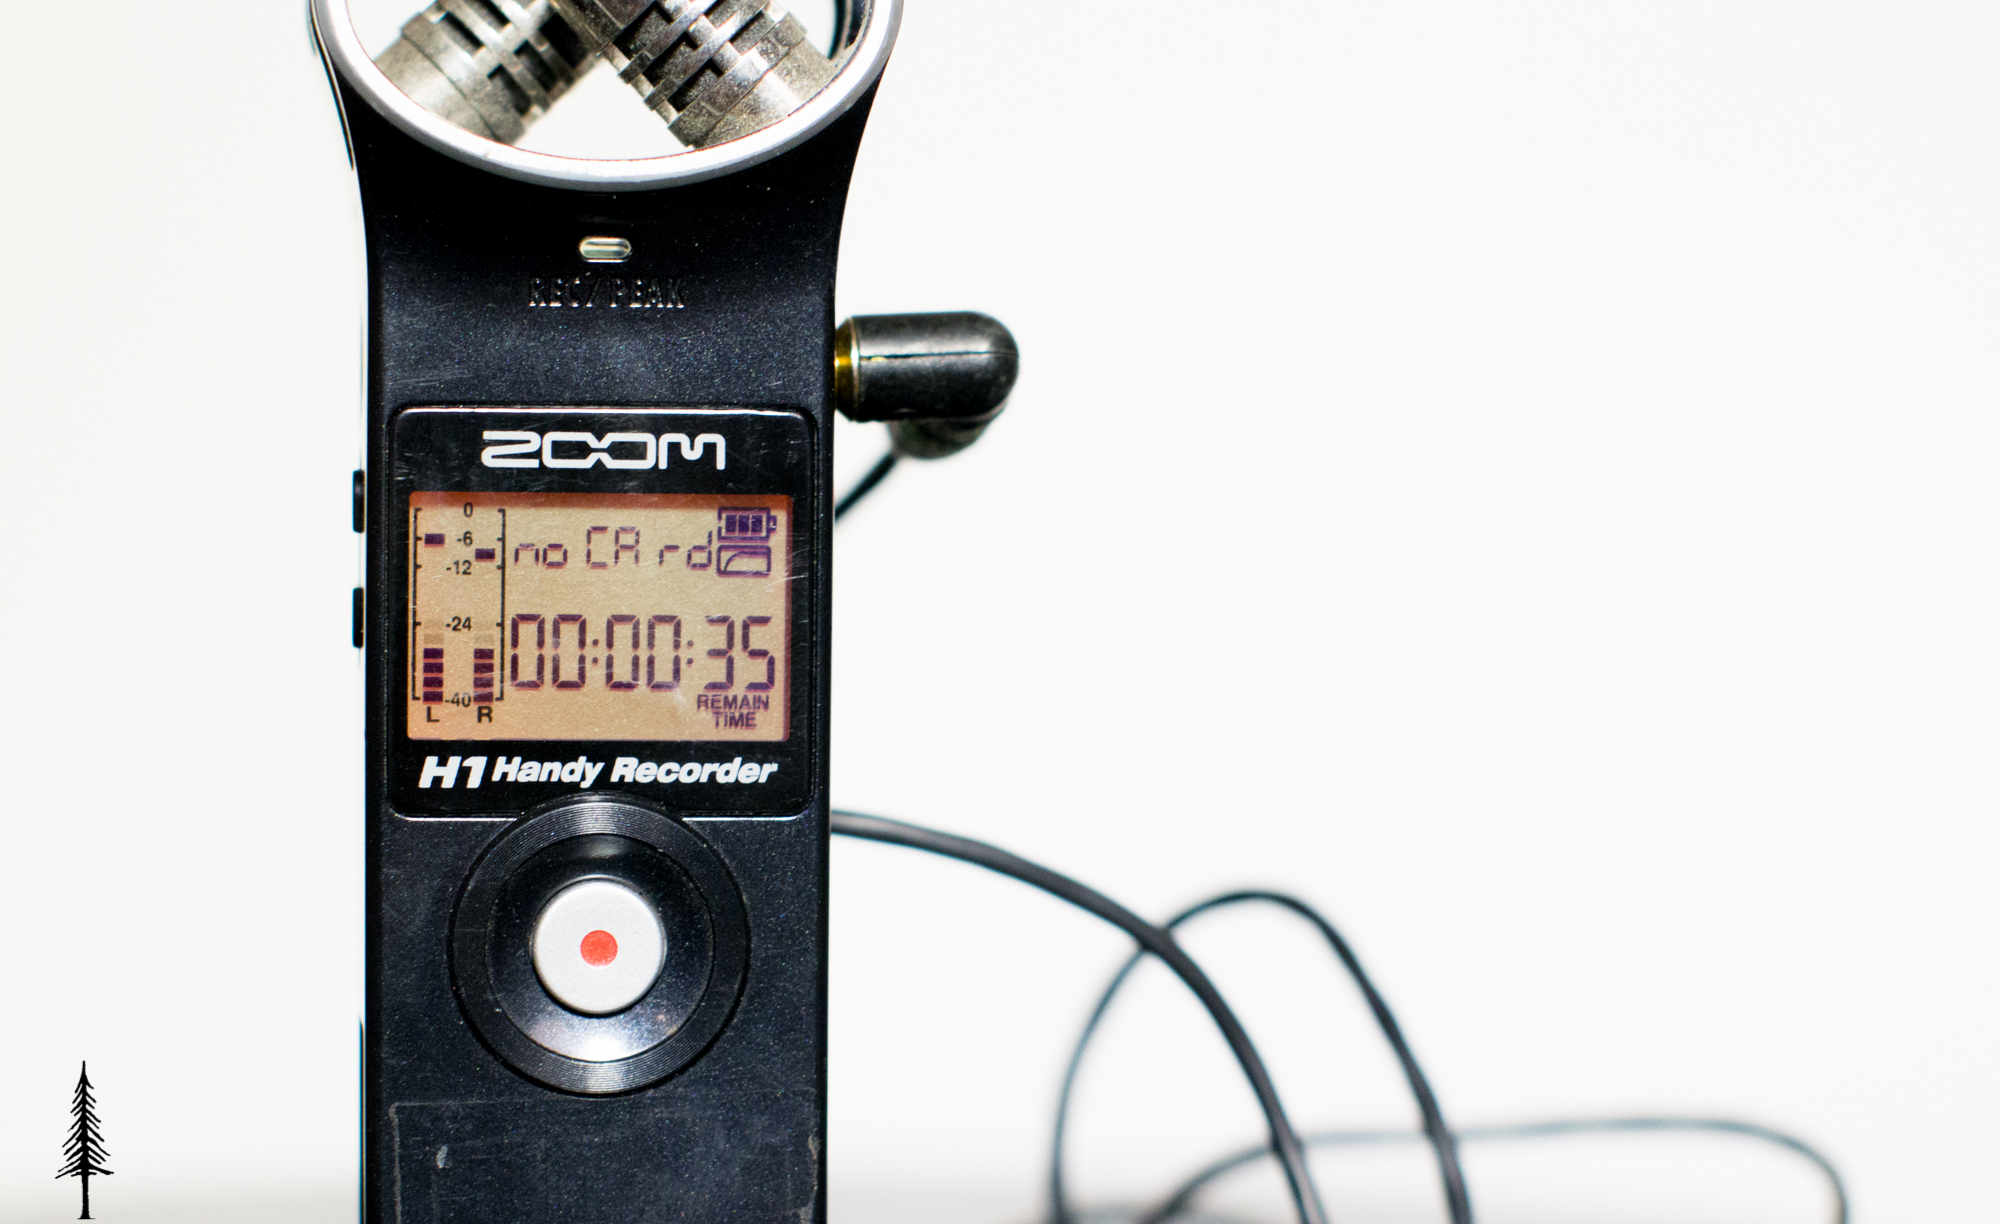
INSTEAD OF INVESTING IN AN ENTIRE WIRELESS MICROPHONE SYSTEM, INVEST IN A SMALL RECORDER TO PUT IN SOMEONES POCKET AND A WIRED LAV MIC. SKIP WIRELESS ALTOGETHER.
That's the magical combination right there. The best audio you are going to get of someone talking is through a shotgun microphone, but the second best option is a LAV mic directly mounted to the subject. Adding this to your production arsenal brings up the quality immensely. If you are going to have any video with talking in it you need to get that audio as best as you can. Eliminate the need for a wireless setup and simultaneously cut down your audio equipment costs exponentially. The principle of using a wired lav with an audio recorder can be applied to many different makes of equipment (rode even makes a mic that plugs into your phone), but I am going to recommend the setup I use. I am going to recommend it because I trust it and I know that it works.
2) GIANT SQUID AUDIO OMNIDIRECTIONAL LAV MIC (You can also buy directly from his site. If you buy from his site you can get a better quality right angle connector which is what I opted for. )
All said and done, the gear comes in at less than 149$ which is fantastic.
This film is an example of using this mic setup in a real life situation.
GreatInterviewSound_Leftcoast_May2015_00014
So you've ordered in your setup, now what?
Here are some tips that will help your first LAV experiences go a lot smoother.
- Set the recording mode to WAV instead of MP3. That way you get more flexibility to EQ in post. (you can turn on lo-cut if you would like.
- For setting the audio gain level most often it's best to go manual. Get the subject talking to you in a normal talking voice and try set it so the average amount of their talking is hitting at least -12 on your meters. This is tough because sometimes if they laugh or get to loud it will peak, so you need to be careful.
- I sometimes set the mic to automatic. I've done this in a wedding ceremony when the mic was on the officiate. It auto leveled when he was talking, but then it would boost the levels and pic up the bride when she was talking.
- I ran two of these LAV setups when shooting weddings (I only shot two). One on the groom and the other on the officiate.
- For placement I try place the mic close to the collar but in a position that it won't scratch and rub if the person is going to move. Personally I don't mind if the mic is slightly visible in the shoot. Getting the good audio is worth it to me.
- If you are shooting a talking head video or an interview, I try get the subject to clap their hands when both the camera and audio are rolling so it eases syncing later in post (i'll get to that in a moment.)
- When you are done put the audio recorder into their pocket and flip the switch to hold once you have hit record. This way non of the buttons get pressed accidentally.
DOUBLE CHECK THAT IT IS RECORDING!!!
It only takes forgetting once to realize how important this is. Even when you are certain you have hit record, double check. So much better to be safe than sorry.
WHAT TO DO IN POST
By using this method you will inevitably end up with a separate audio file and separate video file. Make sure you get your cameras mic loud enough even though you won't use it, because you need this audio to sync the video and audio together. If you had the subject clap, just line up the clap and you are good to go. If not you might need to begin the tedious process of manually lining it up. Investing in Plural Eyes is a great option because it does a great job os syncing your audio for you.
I hope this setup helps you. I love it and continually use it to this day. It is so handy to be able to put a mic on a subject and have it rolling all day. If you have any questions or if things were unclear, join the Leftcoast Collective for free in order to email me directly, or reach out to me on twitter.
Remember, life's better when you make stuff.
Written by: Levi Allen VanderKwaak
How to Edit Video Interviews ✂️

https://www.youtube.com/watch?v=Y3jHCcXUfoM
This week is all about editing interviews. This can definitely be one of the more daunting steps in the process of making films. Let's assume at this point you were able to capture an interview with your subject using some of the techniques I talked about last week. Now you are ready to start making your edit.
Often I find this stage challenging. Usually the interview didn't go quite as well as I had hoped it would. Maybe my audio wasn't as good as I wanted, or maybe the subject got off topic a lot. Either way I have found that if I am going to edit an interview, it works the best to do it within days if not hours of shooting it. The longer you put it off, the harder it will be to start.
Editing an interview right after shooting it, is good for a few reasons:
- You remember most clearly what you talked about and the flow of the conversation.
- The interviews for your project don't add up and become overwhelming to edit (Trust me, needing to edit 10 interviews to finish your project is a lot more frustrating than just editing one at a time).
- Once you are done editing it helps you get a better idea of your story thread and you can more strategically interview in the future or collect the proper BRoll you need.
Editing Interviews is Far Easier Following Strategic Steps
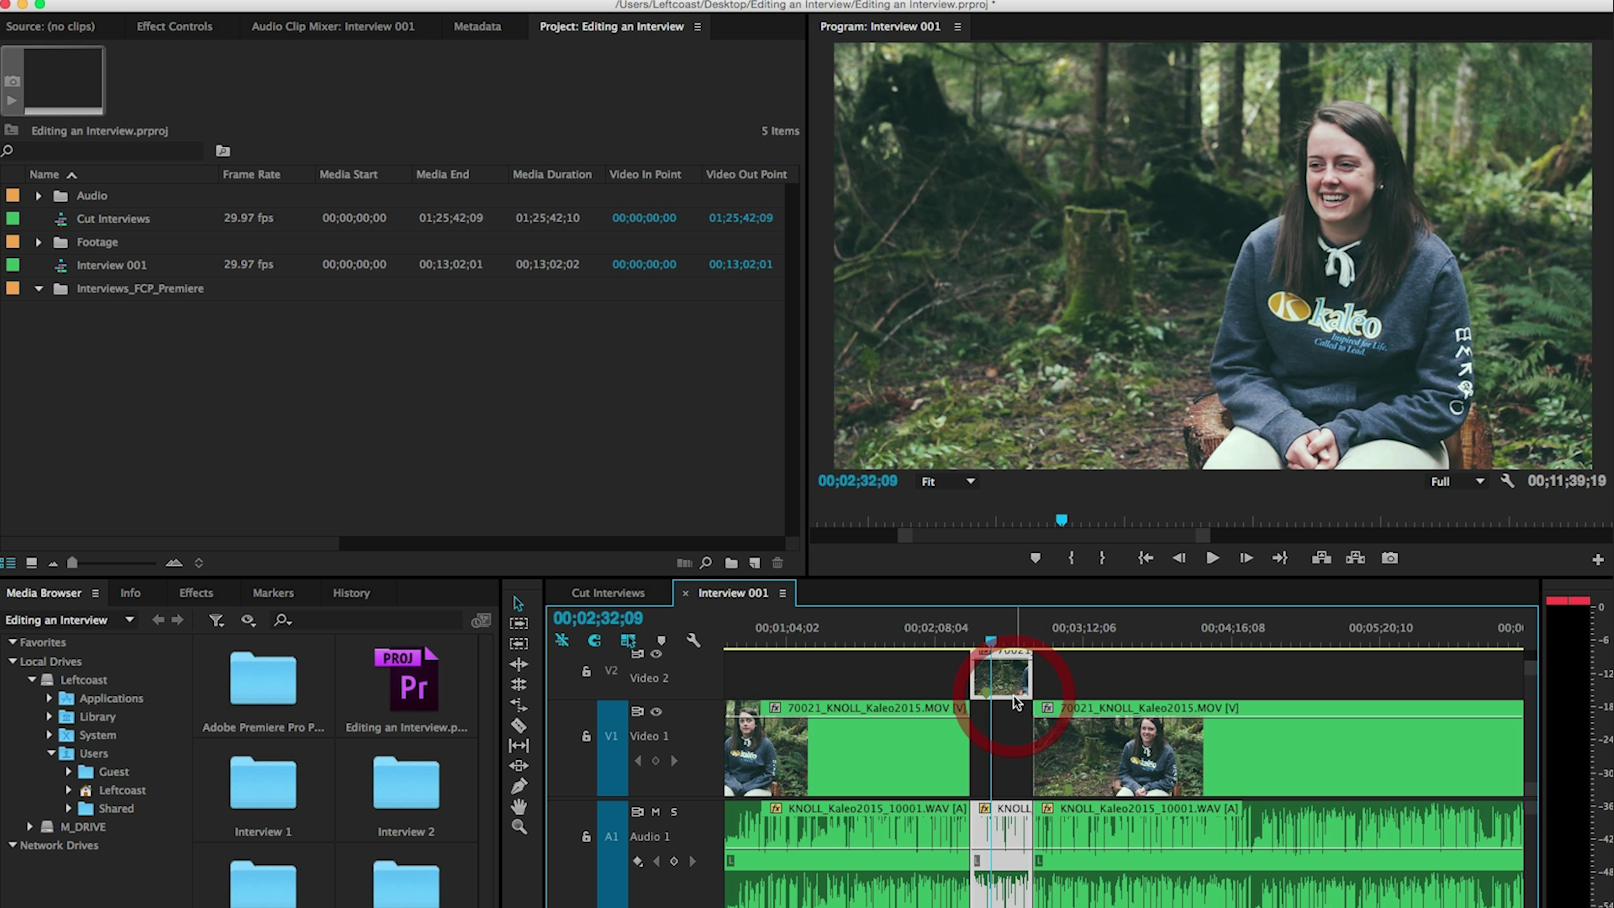
1. Create Your Project and Add Your Entire Interview to a New Sequence.
- This is the foundation I start from. I create a new sequence for each interview I cut. Once I take my selects from this sequence I always have it to reference back to.
2. Begin Cutting Out the Sections of Just the Subjects Answers.

- The main principal here is just trying to remove the sections of me talking.
- Use the slicing tool to cut right after I ask the question, and then right after. (In Premiere the shortcut for the razor is 'C')
- Double press 'L' to fast forward though sections to speed up the process. Speed of editing is key.
3. Raise the Answers You Really Like.
- Take the sections of the interview you like the most and drag them to the layer above so you can easily see them afterwards.
- I then copy all of these to a new sequence and close the gaps between the clips.
4. Color Code Your Clips.

- When I am editing I love using colors to keep everything visually organized.
- I usually color code each interview so I can easily see the different ones in my timeline.
- Another way I color code is giving a different color to different subjects that are talked about. For example, I would make the sections talking about action all blue, and make the sections talking about struggles all green.
5. Piece Together the Story.
- This is my favorite part. Once you have all your selects out of the interview, you get to begin the fun process of piecing them together in order on your timeline.
- I usually group stuff in the way I want the story line to progress. I try my best to make sections of different topics or trains of thought. I create these mini story lines of sorts. I then try build it out and see if it will work for the film.
6. Fine Tune and Remove
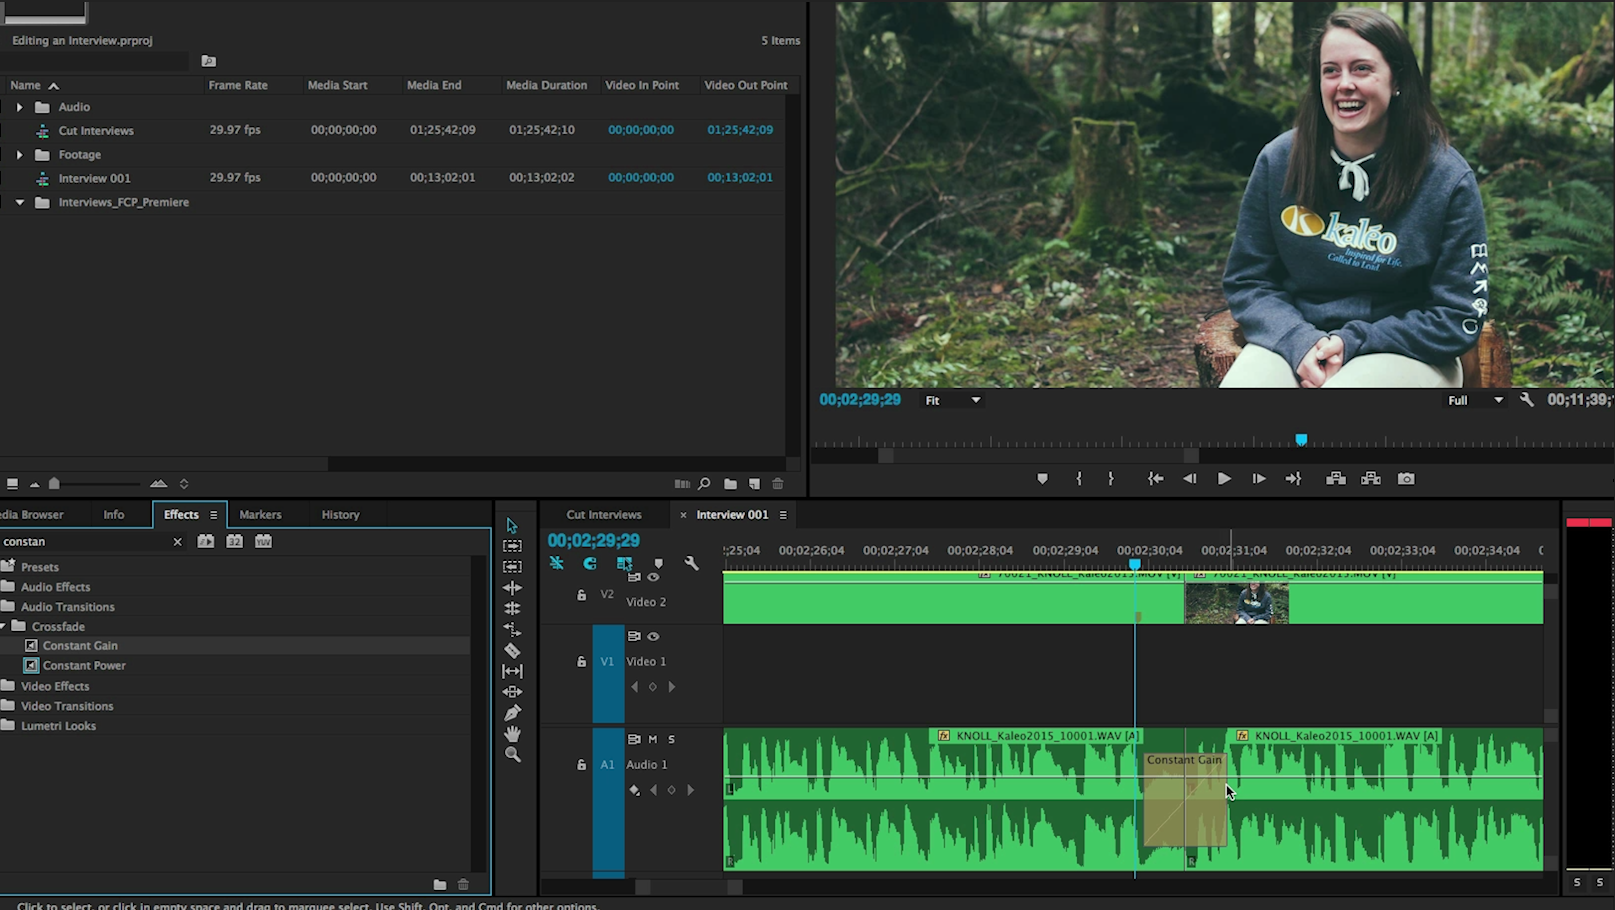
- Once I have built my basic story arc, I begin to fine tune the interview and clean it up a bit. For the sections where clips are playing over top of them talking, I try my best to remove their speech imperfections like 'ums' and 'ahs'.
- In-between these new cuts there is often a pop in the audio of sorts. I add a transition called Constant Gain here in order to smooth everything out.
Try your best to enjoy it and not stress to much. Editing interviews can really be enjoyable once you get used to the process and gain speed and efficiency. It is really rewarding to boil down a 30 minute interview to a 2-3 minute well spoken piece.
Do you have any questions?
If you have any questions about any step of this process, or maybe you know a better way to go about it, please get in touch, I honestly would love to hear from you. The best way to reach me is by joining the Leftcoast Collective and responding to me directly by email. You can also always connect with me on Twitter or Facebook.
Download Free Guide
I have made this guide available to all current and future subscribers of the Leftcoast Collective. If you would like to receive a copy of it directly join the Leftcoast Collective bellow. I will continue to send free great content every Thursday and you can unsubscribe at any time. [yks-mailchimp-list id="e34efe9754" submit_text="SEND ME THE FREE EBOOK!"]
Written by: Levi Allen
New Free Guide: Levi Allen's Tool Box


I Love the Productive Edge
I am a huge fan of tools that help me gain a productive edge and work more efficiently at what I love to do. For me I find the right tools can help me spend more time on the right things, and focus more energy on actually creating.
Sharing the Tools that Others Share With Me
I get asked often which software I use for certain things, and which plugins are my favorite. I love answering this questions, but I don't want that information to be limited to just the email replies I send, so I decided to create and entire guide. This week I am launching for the first time a guide on all the tools I use daily on my computer. These are the tools that I simply cannot do without. I am a Mac user, and so this is primarily a guide for other Mac users as well.

Download the Free Guide
I have made this guide available to all current and future subscribers of the Leftcoast Collective. If you would like to receive a copy of it directly join the Leftcoast Collective bellow. I will continue to send free great content every Thursday and you can unsubscribe at any time.
[yks-mailchimp-list id="e34efe9754" submit_text="SEND ME THE FREE EBOOK!"]
What Tools are Your Favorite?
I love meeting other Mac Power Users because they always have some awesome tips that I knew nothing about. What are some of your favorite tools? Connect with me on facebook or twitter, I would love to hear from you!